
Introduction
Some recipes become regular favorites simply because they fit naturally into everyday life. These cookies are one of those dependable treats that come together with familiar pantry ingredients and a simple mixing process. Rice Krispie Chocolate Chip Cookies combine a classic cookie dough with crisp cereal and chocolate chips for a texture that feels both familiar and a little different. They’re just as welcome on a quiet afternoon as they are for weekend baking or sharing with family. Let’s walk through the recipe together.
Why You’ll Love This Recipe Rice Krispie Chocolate Chip Cookies
Rice Krispie Chocolate Chip Cookies are easy to prepare and rely on simple ingredients that many home bakers already keep on hand. The combination of buttery cookie dough, chocolate chips, and crisp Rice Krispies creates a pleasant balance of texture without making the recipe complicated. Whether you’re baking for family, friends, or a relaxed weekend at home, these cookies are a reliable recipe you’ll enjoy making again.

Kitchen Tools You’ll Need
- Large mixing bowl
- Medium mixing bowl
- Measuring cups
- Measuring spoons
- Mixing spoon or hand mixer
- Rubber spatula
- Cookie sheets
- Parchment paper
- Wire cooling rack
Ingredients
- 1 cup unsalted butter, softened (for a smooth, creamy dough)
- 1 cup granulated sugar (adds sweetness)
- ½ cup brown sugar, packed (adds moisture and a deeper flavor)
- 2 large eggs (help bind the dough)
- 1 teaspoon vanilla extract (adds gentle flavor)
- 2 cups all-purpose flour (forms the structure of the cookies)
- 1 teaspoon baking soda (helps the cookies rise slightly)
- ½ teaspoon salt (balances the sweetness)
- 2 cups Rice Krispies cereal (adds a crisp texture)
- 1 cup chocolate chips (adds chocolate throughout the cookies)
How to Make Rice Krispie Chocolate Chip Cookies
Step 1.
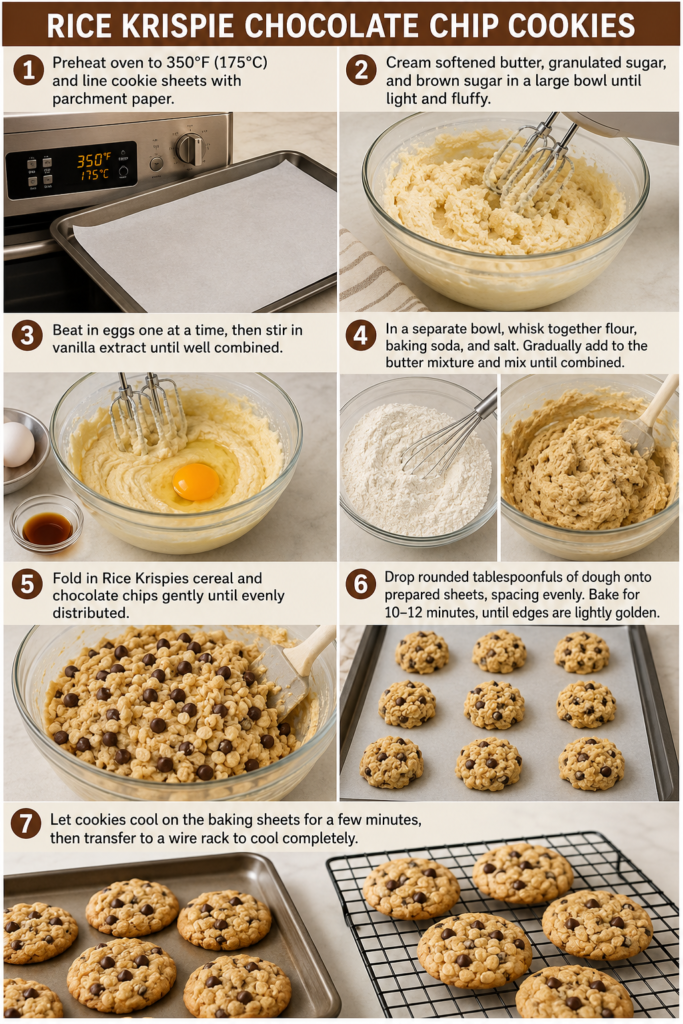
Begin by preheating your oven to 350°F (175°C) and prepare your cookie sheets by lining them with parchment paper. Starting with a fully heated oven helps the cookies bake evenly from the moment they go in. The parchment paper also provides a simple surface for the dough and makes removing the finished cookies easier. Once everything is prepared, you can move through the remaining steps without interruption, making the baking process feel smooth and organized.
Step 2.
Place the softened butter into a large bowl with the granulated sugar and packed brown sugar. Cream the mixture together until it becomes light and fluffy. This stage should leave the sugars well blended into the butter with a smooth, creamy appearance rather than a dense mixture. When the mixture looks lighter in both texture and color, you’ll know it is ready for the next ingredients.
Step 3.
Beat in the eggs one at a time, allowing each egg to blend into the mixture before adding the next. Once both eggs are fully incorporated, stir in the vanilla extract until evenly combined. The dough should remain smooth and cohesive without visible streaks of egg. Taking this step one ingredient at a time helps everything mix together evenly while keeping the batter consistent.
Step 4.
In a separate bowl, combine the all-purpose flour, baking soda, and salt until they are evenly mixed. Gradually add this dry mixture into the creamed butter mixture, blending well as you go. Continue mixing until no dry flour remains visible and the dough comes together evenly. The finished dough should look soft and uniform, with all of the dry ingredients fully incorporated throughout.
Step 5.
Gently fold the Rice Krispies cereal and chocolate chips into the dough. Stir carefully so the cereal stays as intact as possible while becoming evenly distributed throughout the mixture. The chocolate chips should also be spread evenly so each scoop of dough contains both cereal and chocolate. When everything appears evenly mixed without crushing the cereal, the dough is ready for shaping.
Step 6.
Drop rounded tablespoonfuls of dough onto the prepared cookie sheets, leaving enough space between each portion. Bake the cookies for 10–12 minutes, watching for the edges to become lightly golden. The centers may still appear slightly soft, which is expected at this point. The lightly browned edges provide the best visual cue that the cookies have finished baking without becoming overly dark.
Step 7.
Allow the cookies to cool on the baking sheets for a few minutes before carefully transferring them to a wire rack to cool completely. This short cooling period gives the cookies time to settle before moving them. Once on the rack, they continue cooling evenly until they reach their final texture. When completely cool, they’re ready to enjoy or store for another time.
Serving Suggestions
Rice Krispie Chocolate Chip Cookies fit naturally into many everyday occasions without needing much planning. They make an easy afternoon snack with a glass of cold milk or a warm cup of coffee. They also work well as part of a casual dessert spread for family dinners, weekend gatherings, or holiday cookie trays.
These cookies are equally convenient for packing into lunch boxes or enjoying during a quiet break at home. Since they cool completely on a wire rack, they’re easy to stack and transport once they’re ready. If you happen to have leftovers, they remain a simple treat to reach for throughout the week. Their combination of crisp cereal and chocolate chips gives each cookie a satisfying texture that feels familiar whether served fresh or enjoyed another day.
Pro Tips for Best Results
- Use softened butter so it creams smoothly with the sugars.
- Cream the butter and sugars until the mixture looks light and fluffy.
- Add the eggs one at a time for a smooth, even dough.
- Mix the dry ingredients together thoroughly before adding them to the wet mixture.
- Fold the Rice Krispies in gently to help maintain their crisp texture.
- Try to make each dough portion a similar size for even baking.
- Watch for lightly golden edges as the best sign that the cookies are done.
- Let the cookies rest on the baking sheet for a few minutes before moving them to the wire rack.
Common Mistakes to Avoid
1. Using Butter That Is Too Cold or Too Soft
The recipe begins by creaming softened butter with the sugars, so the butter should be soft enough to blend smoothly without being melted. Butter that is too cold can make the mixture difficult to cream, while overly soft butter may not produce the same light, fluffy consistency. Allow the butter to soften naturally so it blends evenly with the sugars and creates a smooth starting mixture.
2. Rushing the Creaming Step
It can be tempting to move quickly to the next ingredients, but the butter and sugars should become light and fluffy before continuing. If this step is cut short, the mixture may remain dense and uneven. Watching for the lighter appearance described in the instructions helps ensure the dough is well prepared before adding the eggs and vanilla.
3. Adding the Dry Ingredients Too Quickly
The flour mixture should be added gradually to the creamed mixture as directed. Pouring everything in at once can make it harder to blend evenly and may leave dry pockets throughout the dough. Mixing gradually allows the ingredients to combine more smoothly while creating an even consistency from the beginning to the end of the mixing process.
4. Crushing the Rice Krispies While Mixing
The Rice Krispies cereal is folded into the dough near the end for its crisp texture. Stirring too vigorously can crush the cereal, reducing that noticeable crunch throughout the cookies. Fold the cereal gently until it is evenly distributed, using just enough mixing to combine everything without breaking it apart unnecessarily.
5. Baking Past the Lightly Golden Stage
The instructions recommend baking until the edges are just turning golden. Leaving the cookies in the oven much longer than this can change their texture more than intended. Instead of focusing only on the clock, look carefully at the edges. Once they begin to develop a light golden color, the cookies are ready to come out of the oven.
6. Moving the Cookies Too Soon
Freshly baked cookies continue to settle during the first few minutes after leaving the oven. Trying to transfer them immediately can make them more likely to break apart before they have had time to firm slightly. Let them cool briefly on the baking sheet as instructed before moving them carefully to the wire rack to finish cooling completely.
Variations & Substitutions
This recipe is designed around its original combination of butter, sugars, Rice Krispies cereal, and chocolate chips, so keeping those ingredients as written will give the intended results.
If needed, one practical adjustment is using either granulated or packed brown sugar if you need to slightly adjust the balance between the two sugars already included in the recipe. Keeping the remaining ingredients and their order the same helps preserve the texture described in the instructions.
The amount of chocolate chips and Rice Krispies can also be distributed evenly throughout the dough exactly as directed to ensure every cookie has a consistent balance of both.
Storage & Reheating
Once the cookies have cooled completely, store them in an airtight container at room temperature. Keeping them sealed helps maintain their texture for several days and makes them easy to enjoy whenever you’d like a quick treat.
For longer storage, the fully cooled cookies can be placed in a freezer-safe container or bag and frozen. When you’re ready to enjoy them again, allow them to thaw naturally at room temperature.
If you prefer a slightly warmer cookie, reheat one briefly until just warmed through. Gentle reheating helps preserve the cookie’s texture without drying it out.
Nutrition Information
Per serving (1 cookie, based on approximately 30 cookies)
- Calories: 175
- Total Fat: 8 g
- Saturated Fat: 5 g
- Carbohydrates: 24 g
- Fiber: <1 g
- Sugar: 14 g
- Protein: 2 g
- Sodium: 105 mg
- Note: Nutrition values are estimates only and may vary depending on ingredient brands, measuring methods, and the final number of cookies baked
Frequently Asked Questions
Can I make this recipe ahead of time?
Yes. You can prepare the dough following the instructions and bake the cookies when you’re ready. If you’ve already baked them, allow them to cool completely before storing them in an airtight container. This makes the recipe convenient for preparing in advance for family gatherings, weekends, or whenever you’d like homemade cookies ready to enjoy.
How long does it last in the fridge?
After the cookies have cooled completely, they may be stored in the refrigerator in an airtight container if you prefer. Before serving, let them come closer to room temperature or warm them gently if desired. Proper storage helps keep the cookies enjoyable while preserving their overall texture as much as possible.
Can I freeze this recipe?
Yes. Once the cookies have cooled completely, place them in a freezer-safe container or freezer bag. Freezing is a practical option when you’d like to save part of the batch for another time. When you’re ready to enjoy them, simply let the cookies thaw at room temperature before serving or warming gently.
What can I substitute for one ingredient?
This recipe is written to work with the listed ingredients, so following it as written is the most reliable approach. If you need to adjust something, keeping the same general balance of the ingredients already included will help maintain the intended texture. Avoid making multiple changes at once, since that can affect the consistency of the finished cookies.
Why didn’t my recipe turn out as expected?
Several small details can influence the final result. Butter that wasn’t properly softened, overmixing the cereal, adding the dry ingredients too quickly, or baking beyond the lightly golden stage can all affect the texture. Following each step carefully and watching the visual cues in the instructions usually leads to a more consistent batch.
Final Thoughts
Rice Krispie Chocolate Chip Cookies are a simple example of how familiar pantry ingredients can come together into a comforting homemade treat. The recipe follows a straightforward process, making it approachable for both occasional bakers and those who enjoy baking regularly. The combination of buttery dough, chocolate chips, and crisp Rice Krispies creates a pleasant texture without adding unnecessary complexity. By following each step carefully and paying attention to the simple visual cues throughout the recipe, you can enjoy a batch of cookies that are ready for everyday snacking, family gatherings, or quiet moments at home. Sometimes the recipes we return to most often are simply the ones that are dependable, easy to prepare, and enjoyable to share.

Rice Krispie Chocolate Chip Cookies
Equipment
- Large Mixing Bowl
- Medium mixing bowl
- Measuring Cups
- Measuring Spoons
- Mixing spoon or hand mixer
- Rubber Spatula
- Cookie sheets
- Parchment Paper
- Wire Cooling Rack
Ingredients
Cookie Dough
- 1 cup unsalted butter softened
- 1 cup granulated sugar
- 1/2 cup brown sugar packed
- 2 large eggs
- 1 tsp vanilla extract
- 2 cups all-purpose flour
- 1 tsp baking soda
- 1/2 tsp salt
- 2 cups Rice Krispies cereal
- 1 cup chocolate chips
Instructions
- Preheat the oven to 350°F (175°C) and line cookie sheets with parchment paper.
- Cream the softened butter, granulated sugar, and brown sugar until light and fluffy.
- Add the eggs one at a time, mixing well after each addition. Stir in the vanilla extract.
- In a separate bowl, combine the flour, baking soda, and salt. Gradually mix the dry ingredients into the wet ingredients until fully incorporated.
- Gently fold in the Rice Krispies cereal and chocolate chips until evenly distributed.
- Drop rounded tablespoonfuls of dough onto the prepared cookie sheets, leaving space between each cookie.
- Bake for 10–12 minutes, until the edges are lightly golden and the centers remain slightly soft.
- Cool the cookies on the baking sheets for several minutes before transferring them to a wire rack to cool completely.